TM 10-4610-246-13
3.8
MAINTENANCE OF ANTISIPHON VALVE AND TUBING - (Cont)
b.
Disassembly.
(1)
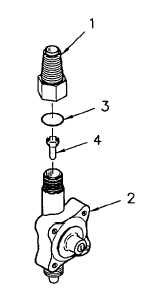
Unscrew injection nozzle head (1,
Figure 3-8) from antisiphon valve (2).
(2) Remove washer (3) and check valve
(4).
c.
Service.
(1)
Discard washer.
(2)
Clean all components of anti-siphon
valve with soap and water.
(3)
Inspect all components for damage.
d.
Repair.
Repair is accomplished by replacement of
defective parts.
e.
Assembly.
(1)
Install check valve (4, Figure 3-8) and washer (3) into antisiphon valve (2).
Hand tighten connections. Overtightening could result in damage.
(2)
Screw injection nozzle head (1) onto antisiphon valve (2).
f.
Installation.
Hand tighten connections. Overtightening could result in damage.
(1)
Install antisiphon valve (3) into outlet pipe assembly (4, Figure 3-7).
(2)
Install tubing (1) onto antisiphon valve (3).
(3)
Screw tube nut (2) onto antisiphon valve (3) and hand tighten.
(4)
Install discharge tubing (refer to para. 3.7).
3-14