MINOR REPAIRS
Neutral Start Switch Replacement
Removal/Installation
Replacement
of
the
neutral
start
switch
may
be
accomplished with the control on the machine providing a
space of .38 in. (9.65 mm) is available for switch removal.
CAUTION
Do
not
disturb
any
locknuts
or
adjustments on the Neutral Start Switch
other than those described in these
procedures.
Disturbing
other
components may result in the prime
mover starting In other than the neutral
(0 flow) position. If other adjustments
are
disturbed
during
replacement,
accomplish the "Neutral Start Switch
Check" procedure on the following
page.
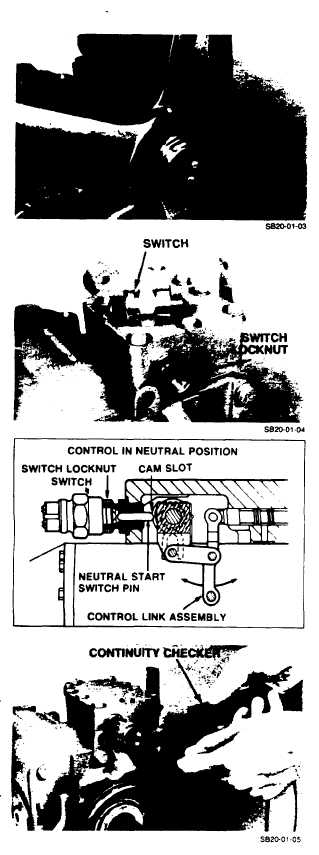
1.
Holding the switch in place with a 1/Be" wrench,
loosen the locknut with a 7/9" wrench.
CAUTION
Do not turn the switch when loosening
the locknut. Turning the switch may
change
other
critical
switch
adjustments.
2.
After the locknut is loose, remove the switch by
turning the switch CCW.
3.
Install the new switch by turning the switch
clockwise until finger tight. Leave the locknut
loose.
Switch Adjustment
1.
Make certain control is in the neutral position. If
the switch is being replaced with the control
removed from the unit, neutral can be verified by
rotating the control link assembly until the Neutral
Start Switch pin is engaged in the slot on the cam
assembly.
2.
Attach a continuity checker to the two screws on
the end of the switch.
3.
With the control in the neutral position, turn the
switch CCW until electrical continuity is obtained.
Turn switch CCW an additional 1/8 turn after
continuity has been obtained.
4.
Holding the switch in place with a 1 1/8" wrench,
tighten the locknut with a 7/8" wrench.
5.
With the continuity checker attached to the switch,
rotate the control lever (or the control link) in each
direction to assure continuity is broken when the
control is not in the neutral position.
Page 32