TM 10-6630-245-13&P
SECTION III. UNIT MAINTENANCE PROCEDURES
4.2. FUSE REPLACEMENT.
This task covers:
a.
Removal/Replacement.
b.
Testing
INITIAL SETUP
Materials/Parts
Equipment Condition
Fuse, PN MIL-F-15160, See Appendix C
Unit disconnected and front panel
Tools
removed (para 2.6.2.3).
Tool Kit, General Mechanics, Automotive, See Appendix B
a. Removal/replacement.
WARNING
High voltage used with Spectrophotometer. Misuse can cause electrical shock and damage
equipment. When operating with 115V or 220V power, make sure the power source and
equipment are in ground potential. Ensure that the power cable connections are correct for the
desired voltage power before connecting the power source.
NOTE
A spare fuse is kept in the bottom of
the Spectrophotometer case.
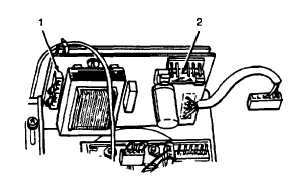
(1)
Remove the fuse(2, fig. 4-1) found at
upper right corner of the power supply
board(l) and replace.
(2)
Ensure that the unit is properly connected
for ac operation. See paragraph 2.6.2.3
a.
b.
Testing.
(1)
Ensure that the unit is properly connected
for ac operation. See paragraph 2.6.2.3
a.
(2)
Zero
the
Spectrophotometer
(para
2.6.2.6). If the unit does not work after
replacing the fuse, replace the unit.
Figure 4-1. Fuse Replacement.
4.3. LAMP REPLACEMENT.
This task covers:
a.
Removal
b.
Replacement
c.
Alignment
INITIAL SETUP
Materials/Parts
Equipment Condition
Lamp Assembly, PN G-10-0031, See Appendix C
Unit disconnected and front panel
Tools
removed (para 2.6.2.3).
Tool Kit, General Mechanics, Automotive, See Appendix B
4-4