ARMY TM 10-4610-309-14
MARINE CORPS TM 10802A-14/1
0054 00
TACTICAL WATER PURIFICATION SYSTEM (TWPS)
UNIT MAINTENANCE PROCEDURES
AIR SYSTEM, HIGH PRESSURE
b. Disconnect the 1/4-in. 90-degree elbow from the 1/4-in. close nipple that is connected to the
check valve.
NOTE
Note the direction of flow for Check Valve V-906 before removing it.
c.
Disconnect Low-Pressure Check Valve V-906 from the 3/4-in. to 1/4-in. reducing bushing.
PRESSURE MAINTAINING VALVE V-905
CHECK VALVE V-906
CLOSE NIPPLE
CLOSE NIPPLE
AIR SYSTEM SECTION 1 ASSEMBLY
PIPE UNION
90-DEGREE ELBOW
REDUCING BUSHING
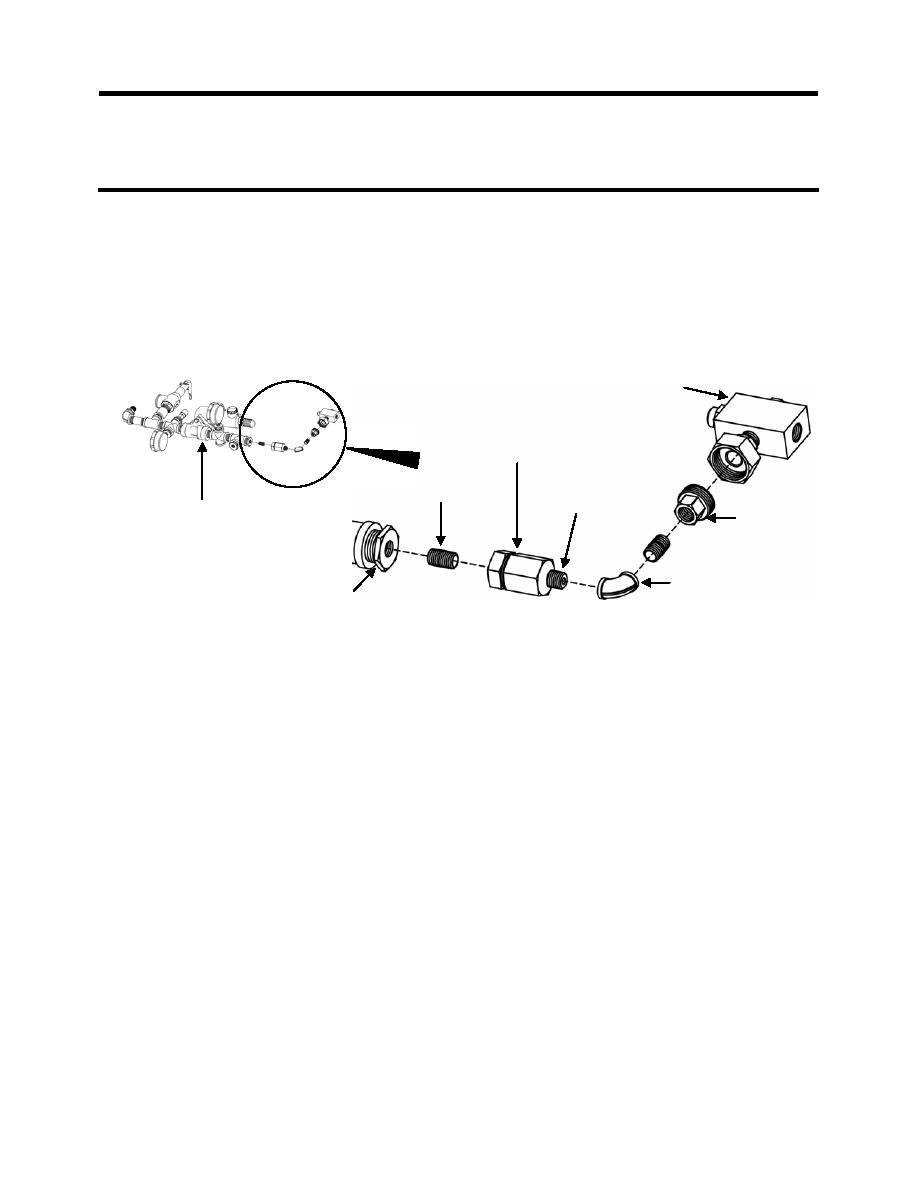
Figure 8. Low-Pressure Check Valve V-906.
4. Place the old Low-Pressure Check Valve V-906 on a clean workbench and perform the following:
a. Remove the two close nipples from the Check Valve.
b. Clean the two close nipples and apply antiseizing tape to one end of each.
c. Thread the taped end of the pipe nipples into each end of the new Low-Pressure Check
Valve V-906.
d. Apply antiseizing tape to the other ends of the pipe nipples.
5. Install new Check Valve V-906 onto the Air System Section 1 assembly as follows (see Figure 8):
NOTE
Make sure the direction of flow for the Check Valve is correct. See Figure 8 for
correct positioning of the Check Valve. Care must be taken not over-tighten.
Loosening the connection once tightened could cause the connection to leak.
a. Thread the check valve and close nipple into the 3/4-in. to 1/4-in. reducing bushing and
tighten.
b. Thread the 1/4-in., 90-degree elbow onto the other close nipple on the check valve and
tighten. Make sure that the position of the 1/4-in., 90-degree elbow matches Figure 8.
c. Clean the threads of the pipe union and apply antiseizing tape to the threads.
d. Thread Pressure-Maintaining Valve V-905 onto the pipe union. Check the correct
positioning of the pressure-maintaining valve.
6. Install the Air System Section 1 assembly onto the TWPS. Refer to REPLACE and Air System
Section 1 Assembly.
7. Check the new Low-Pressure Check Valve V-906 for leaks.
0054 00-13


