TM 10-4610-215-10
TM 08580A-10/1
(4) After inserting the element puller into the R.O. elements and attaching the element puller
plate, the assembly will be as shown below.
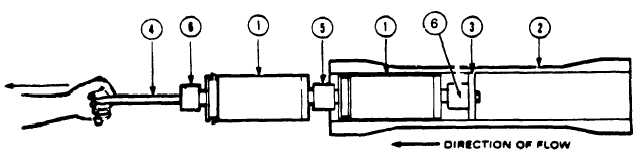
e. Removal. (Refer to fig. 3-4)
(1) Slowly pull both R.O. elements (1) from R.O. vessel (2), while someone else supports
assembly. Be careful to keep element puller centered in tube.
NOTE
Placing one hand on frame while pulling with the other hand may help to keep
the element puller centered.
LEGEND:
1. R.O. Elements
4.
Element Puller
2. R.O. Vessel
5.
Interconnector
3. Element Puller Plate
6.
End Connector
Figure 3-4. Pulling Element From R.O. Vessel
(2) Disconnect the element puller plate (3) after both R.O. elements are removed. Pull element
puller out of R.O. elements and end connectors. With one person on either end of assembly, twist and pull
elements apart.
f. Inspection.
(1) Inspect inside R.O. vessels for nicks and gouges.
(2) Check interconnector and both end connectors for deep scratches and cracks.
(3) Check brine seals and O-rings for cracks and tears.
g. Cleaning.
(1) Flush dirt from inside R.O. vessels using brine water.
(2) Wipe any dirt from interconnector or end connectors using a clean cloth.
h. Installation. (Refer to fig. 3-5).
(1) Lubricate O-rings with O-ring lubricant from Storage Box No. 2.
3-21