TM 10-4610-232-12
(14) Remove two screws (25) and remove solenoid valve (26).
(15) Remove preformed packing (27).
(16) If necessary, remove plug (28) and fitting (29).
c.
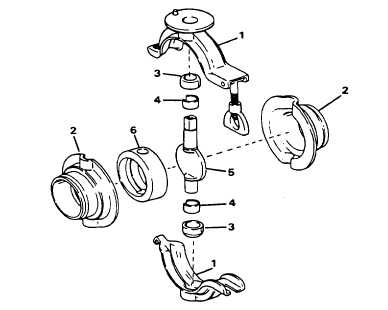
Refer to Figure 4-53 and disassemble the butterfly valve as follows:
(1)
Remove two clamp halves (1) from body valve halves (2) and separate the two body halves.
(2)
Remove bushings (3) and bushings (4) from disc and shaft (5).
(3)
Remove valve liner (6).
REPAIR.
a.
Repair of the upper section (Figure 4-52) consists of replacement of damaged, missing or unserviceable parts and
tubing.
b.
Replace all damaged, missing or unserviceable parts of butterfly valves (Figure 4-53).
c.
Repair leaks at fittings with antiseize tape.
REASSEMBLY.
CAUTION
DO NOT overtighten. The threads in the actuator housing will be stripped.
a.
Refer to Figure 4-53 and reassemble butterfly valve as follows:
(1)
Position valve liner (6), bushing (4) and bushing (3) on disc and shaft (5).
Figure 4-53. Butterfly Valves
(MODEL WTA-060 ONLY)
Change 7 4-201


