TM 10-4610-246-13
4.17
MAINTENANCE OF OUTLET PIPE ASSEMBLY
This task covers:
a.
Removal
c.
Service
e.
Assembly
b.
Disassembly
d.
Repair
f.
Installation
INITIAL SETUP
Tools
Equipment Conditions
Tool Kit, General Mechanics
Hypochlorination unit is shut down (para. 2.9).
(Item 1, App. B)
Antisiphon valve removed (para. 3.8).
Parts/Materials
Tape, Anti-seize
(Item 8, App. E)
a.
Disassembly.
(1)
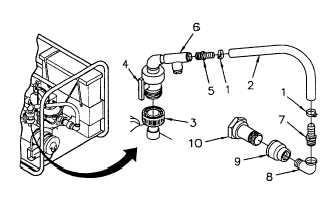
Remove two hose clamps (1, Figure 4-
4) and hose (2).
(2)
Unscrew ball valve collar (3) and
remove ball valve body (4) and tee (6).
(3)
Remove straight adapter (5) from tee
(6).
(4)
Remove straight adapter (7) from pipe
elbow (8).
(5)
Remove pipe elbow (8) from reducer
coupling (9).
(6)
Remove reducer coupling (9) from
outlet pipe (10).
Figure 4-4. Outlet Pipe Assembly
b.
Service.
(1)
Remove anti-seize tape and clean pipe threads on all parts.
(2)
Inspect for damaged pipe threads. Replace any fitting with stripped or damaged threads.
(3)
Inspect non-metallic hose for cracks. Replace if necessary. Refer to Appendix G.
4-11